


Overview
Classification is how Shopcada groups your products, and almost every other feature works off it: your listing pages, your filters, your discounts, your size charts and your reports.
The Classification Types
| Type | Use it for | What only this type does |
|---|---|---|
| Category | What the product is. Tops, Dresses, Bottoms. | Required on a product import file. Becomes part of the product’s web address, on stores set up that way. Carries the Google / Facebook / TikTok product category that the shopping feeds need. |
| Collection | How you want to sell it. New Arrival, Sale, Backorder. | A new Collection can be created while you edit a product. A Category cannot. The Collections behind Sale and New are chosen under Dashboard > Settings > Products. |
| Brand | The label or maker. | Your theme, the mobile app and the Shopcada API read Brand as its own field, not as a general tag. |
| Colour | The colour of the product. | Read as its own field, the same way Brand is. |
| Other tags | Anything else you want to filter, promote or report on. Fabric, Season, Occasion, Fit. | Named with a (Tag) suffix in the product import file, to keep it apart from Category and Collection. |
Category and Collection are on every store. Brand, Colour and the other tags exist only if your store was set up with them.
You can add as many values as you like to any type.
Adding a whole new type, such as Fabric, is done by Shopcada. Email support@shopcada.com with the name and what you want to use it for.
Where Classification Is Used
This is why it pays to settle your classifications early. Retagging a catalogue later means reworking everything below.
| What it drives | Where you set it up |
|---|---|
| A page to browse | Tick Has a web page on the value. It gets its own listing page on your website, and a Rearrange Sequence link for ordering the products on it. |
| Filters on a listing page | Dashboard > Settings > Products, then the Product Listing Filter Settings tab. Every classification is offered as a filter group. Turn on the ones you want, rename them for shoppers and set their order. |
| Product blocks on any page | Dashboard > Website > Home Page Editor or Content Manager. A product block pulls from the classification you choose, so the page keeps itself up to date. |
| Discounts | Dashboard > Marketing > Discounts. A discount can apply to chosen classifications, and exclude others. |
| Timed sales | Dashboard > Marketing > Timed Sale. |
| Gift with Purchase | Dashboard > Marketing > Gift With Purchase. Both the qualifying spend and the gifts on offer are set by classification. |
| Store credit and cashback rewards | On the reward rule. Products in the chosen classifications are left out of the qualifying amount. |
| Reward points redemption | On your Reward Points settings. Points cannot be redeemed while the cart holds a product from the chosen classifications. |
| Size charts | Dashboard > Products > Size Chart. A chart is attached to classifications, not to products, so every product tagged to them shows it. |
| A message in the cart and on the order | The Tag Line on a Category or Collection. It follows the product into the cart, the order and the POS. |
| Shipping | Dashboard > Settings > Shipping. Flat rates can be charged per classification, and the free-shipping message can count or ignore products by classification. |
| Returns | Dashboard > Settings > Orders, then the Return Requests tab. Items in the chosen classifications cannot be returned. |
| Payment methods | Dashboard > Settings > Payments, then the method. A method can be hidden when the cart holds a product from the chosen classifications. |
| Shopping feeds | The Google / Facebook / TikTok Product Category on each Category. |
| Reports | Dashboard > Reports. Filter on Product Classification (Current) for how a product is tagged today, or Product Classification (Checkout) for how it was tagged when the order was placed. |
Shopcada records a product’s Category and Collection on every order line.
Retag a product today and past orders still report under the classification they sold in.
Create a Classification Value
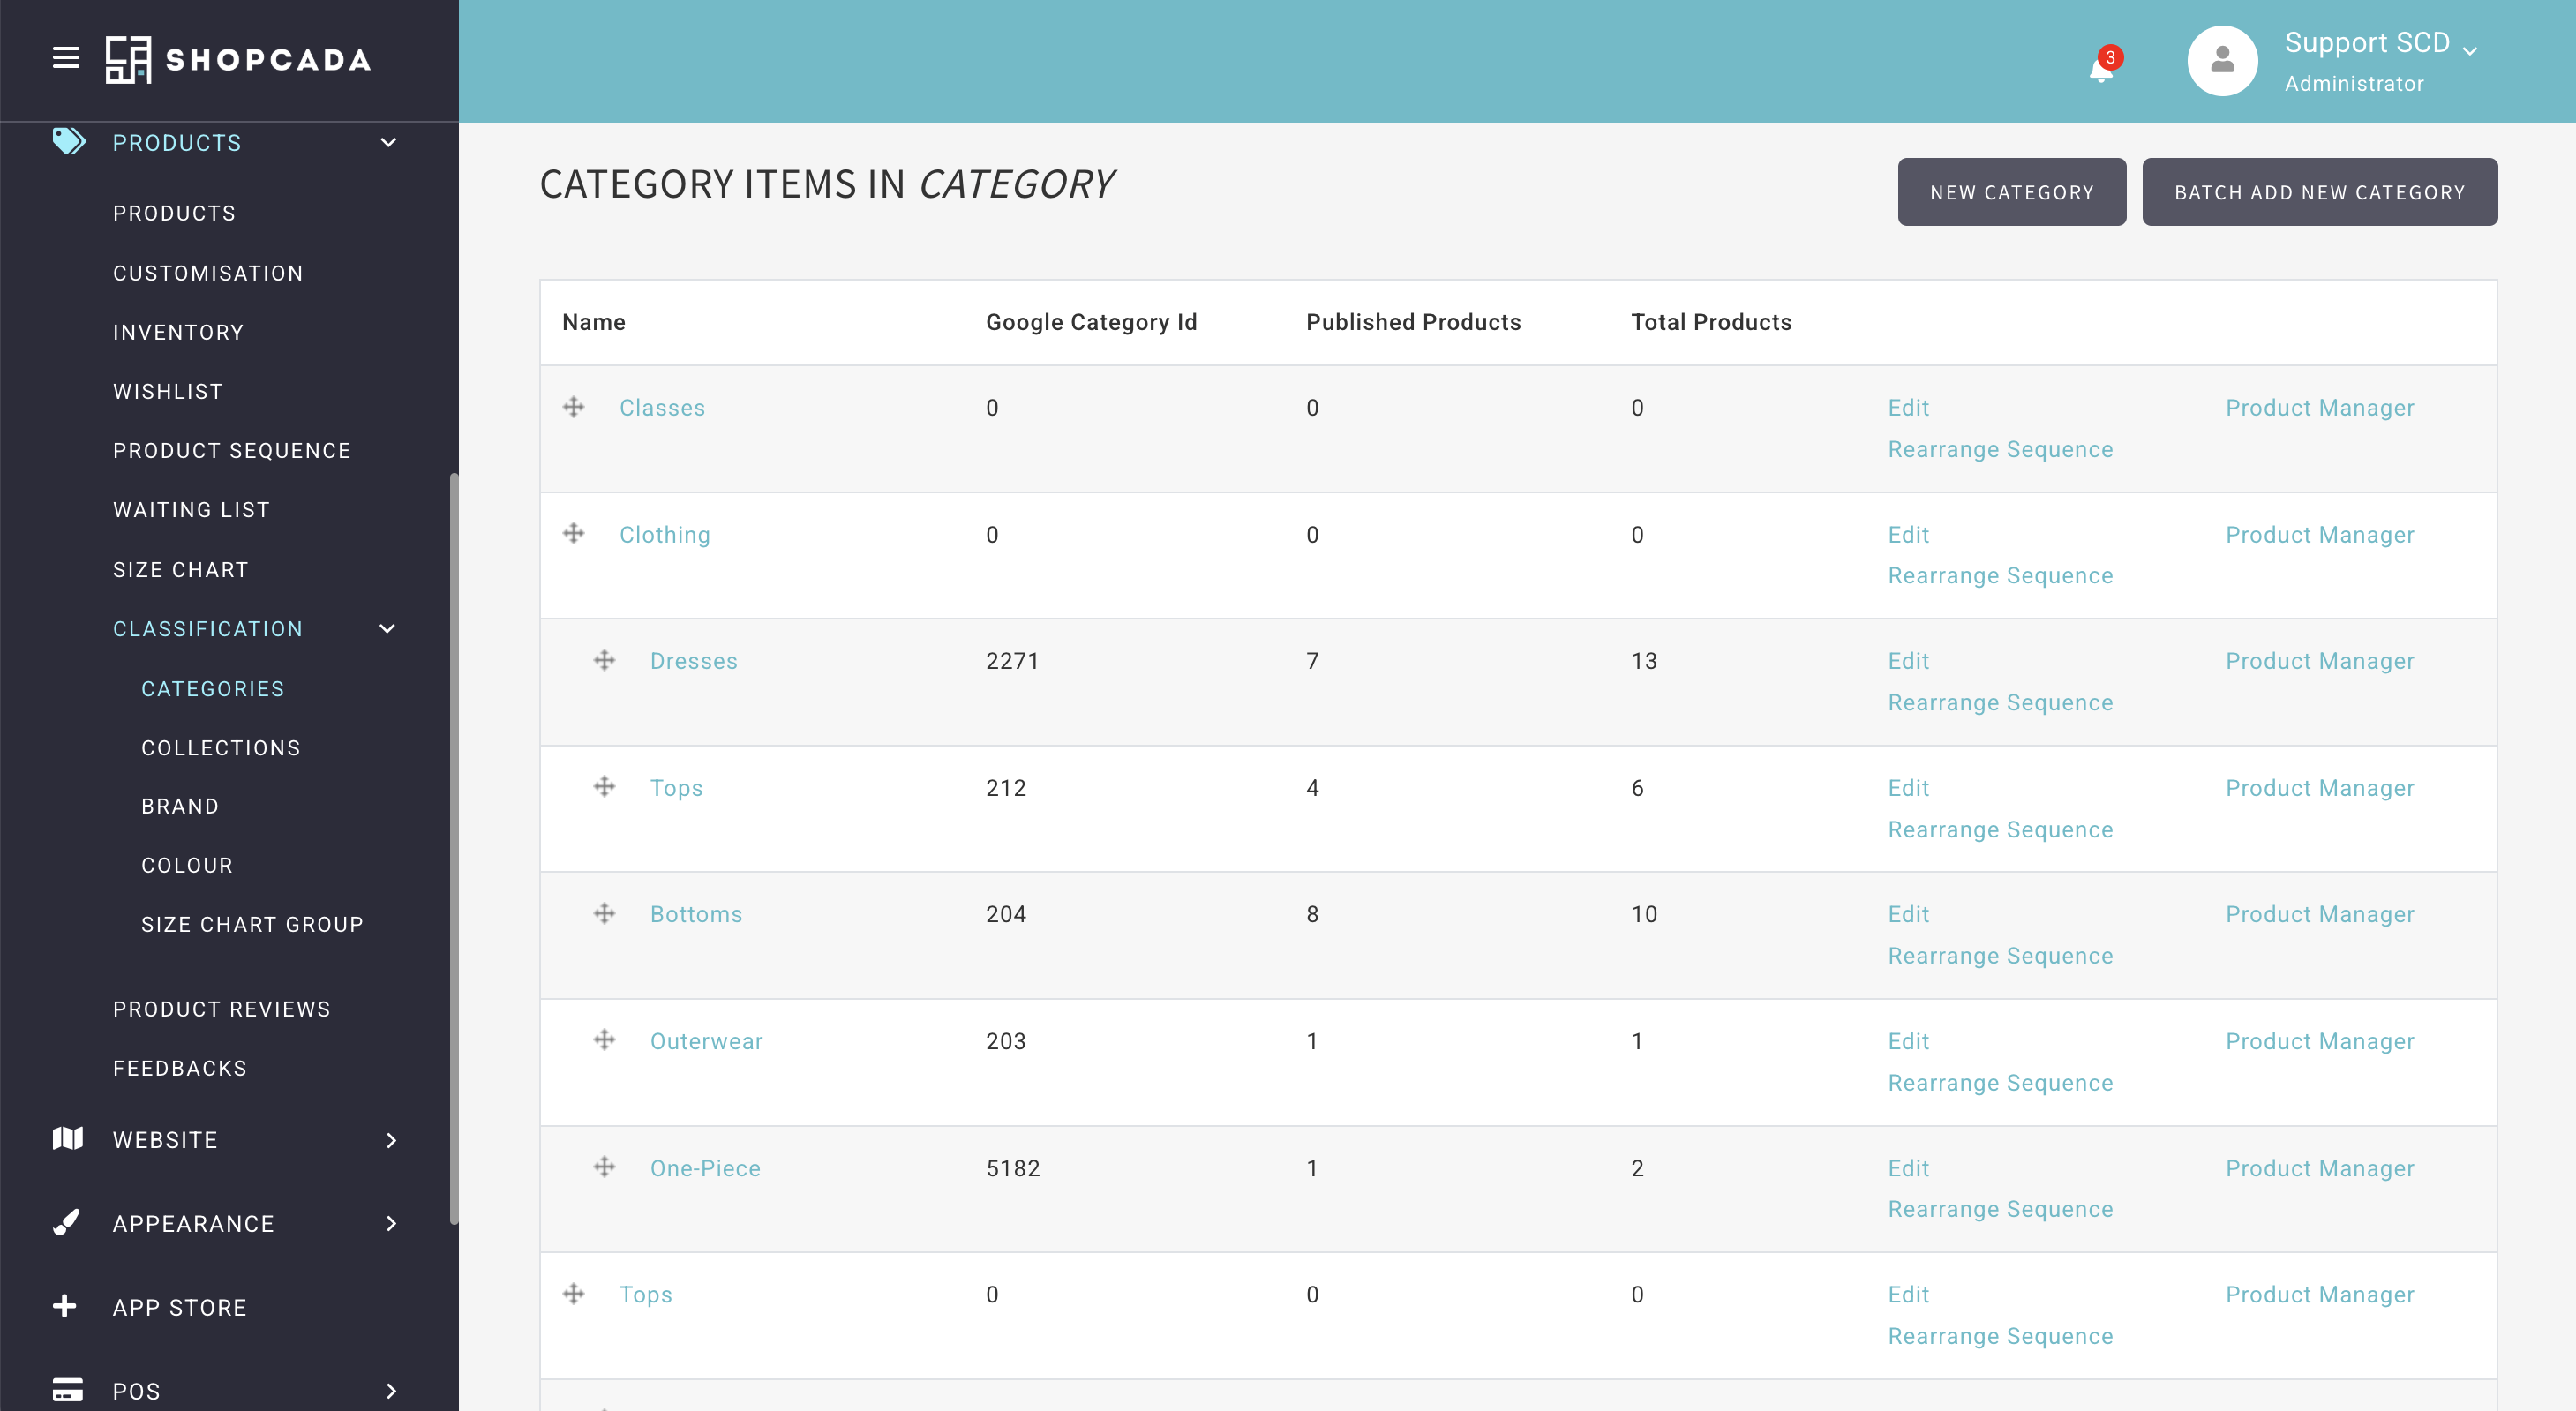
Navigate to Dashboard > Products > Classification, then click the type you want.
One at a Time
- Click New, followed by the type name.
- Enter the name.
- Click Save.
This form does not check the name against the values you already have. Enter the same name twice and you get two values with the same name.
Several at Once
- Click Batch Add New, followed by the type name.
- Enter one name per line.
- Choose a Default Parent, or leave it on No Parent for a top level.
- Tick or untick Create webpage for newly created.
- Click Create.
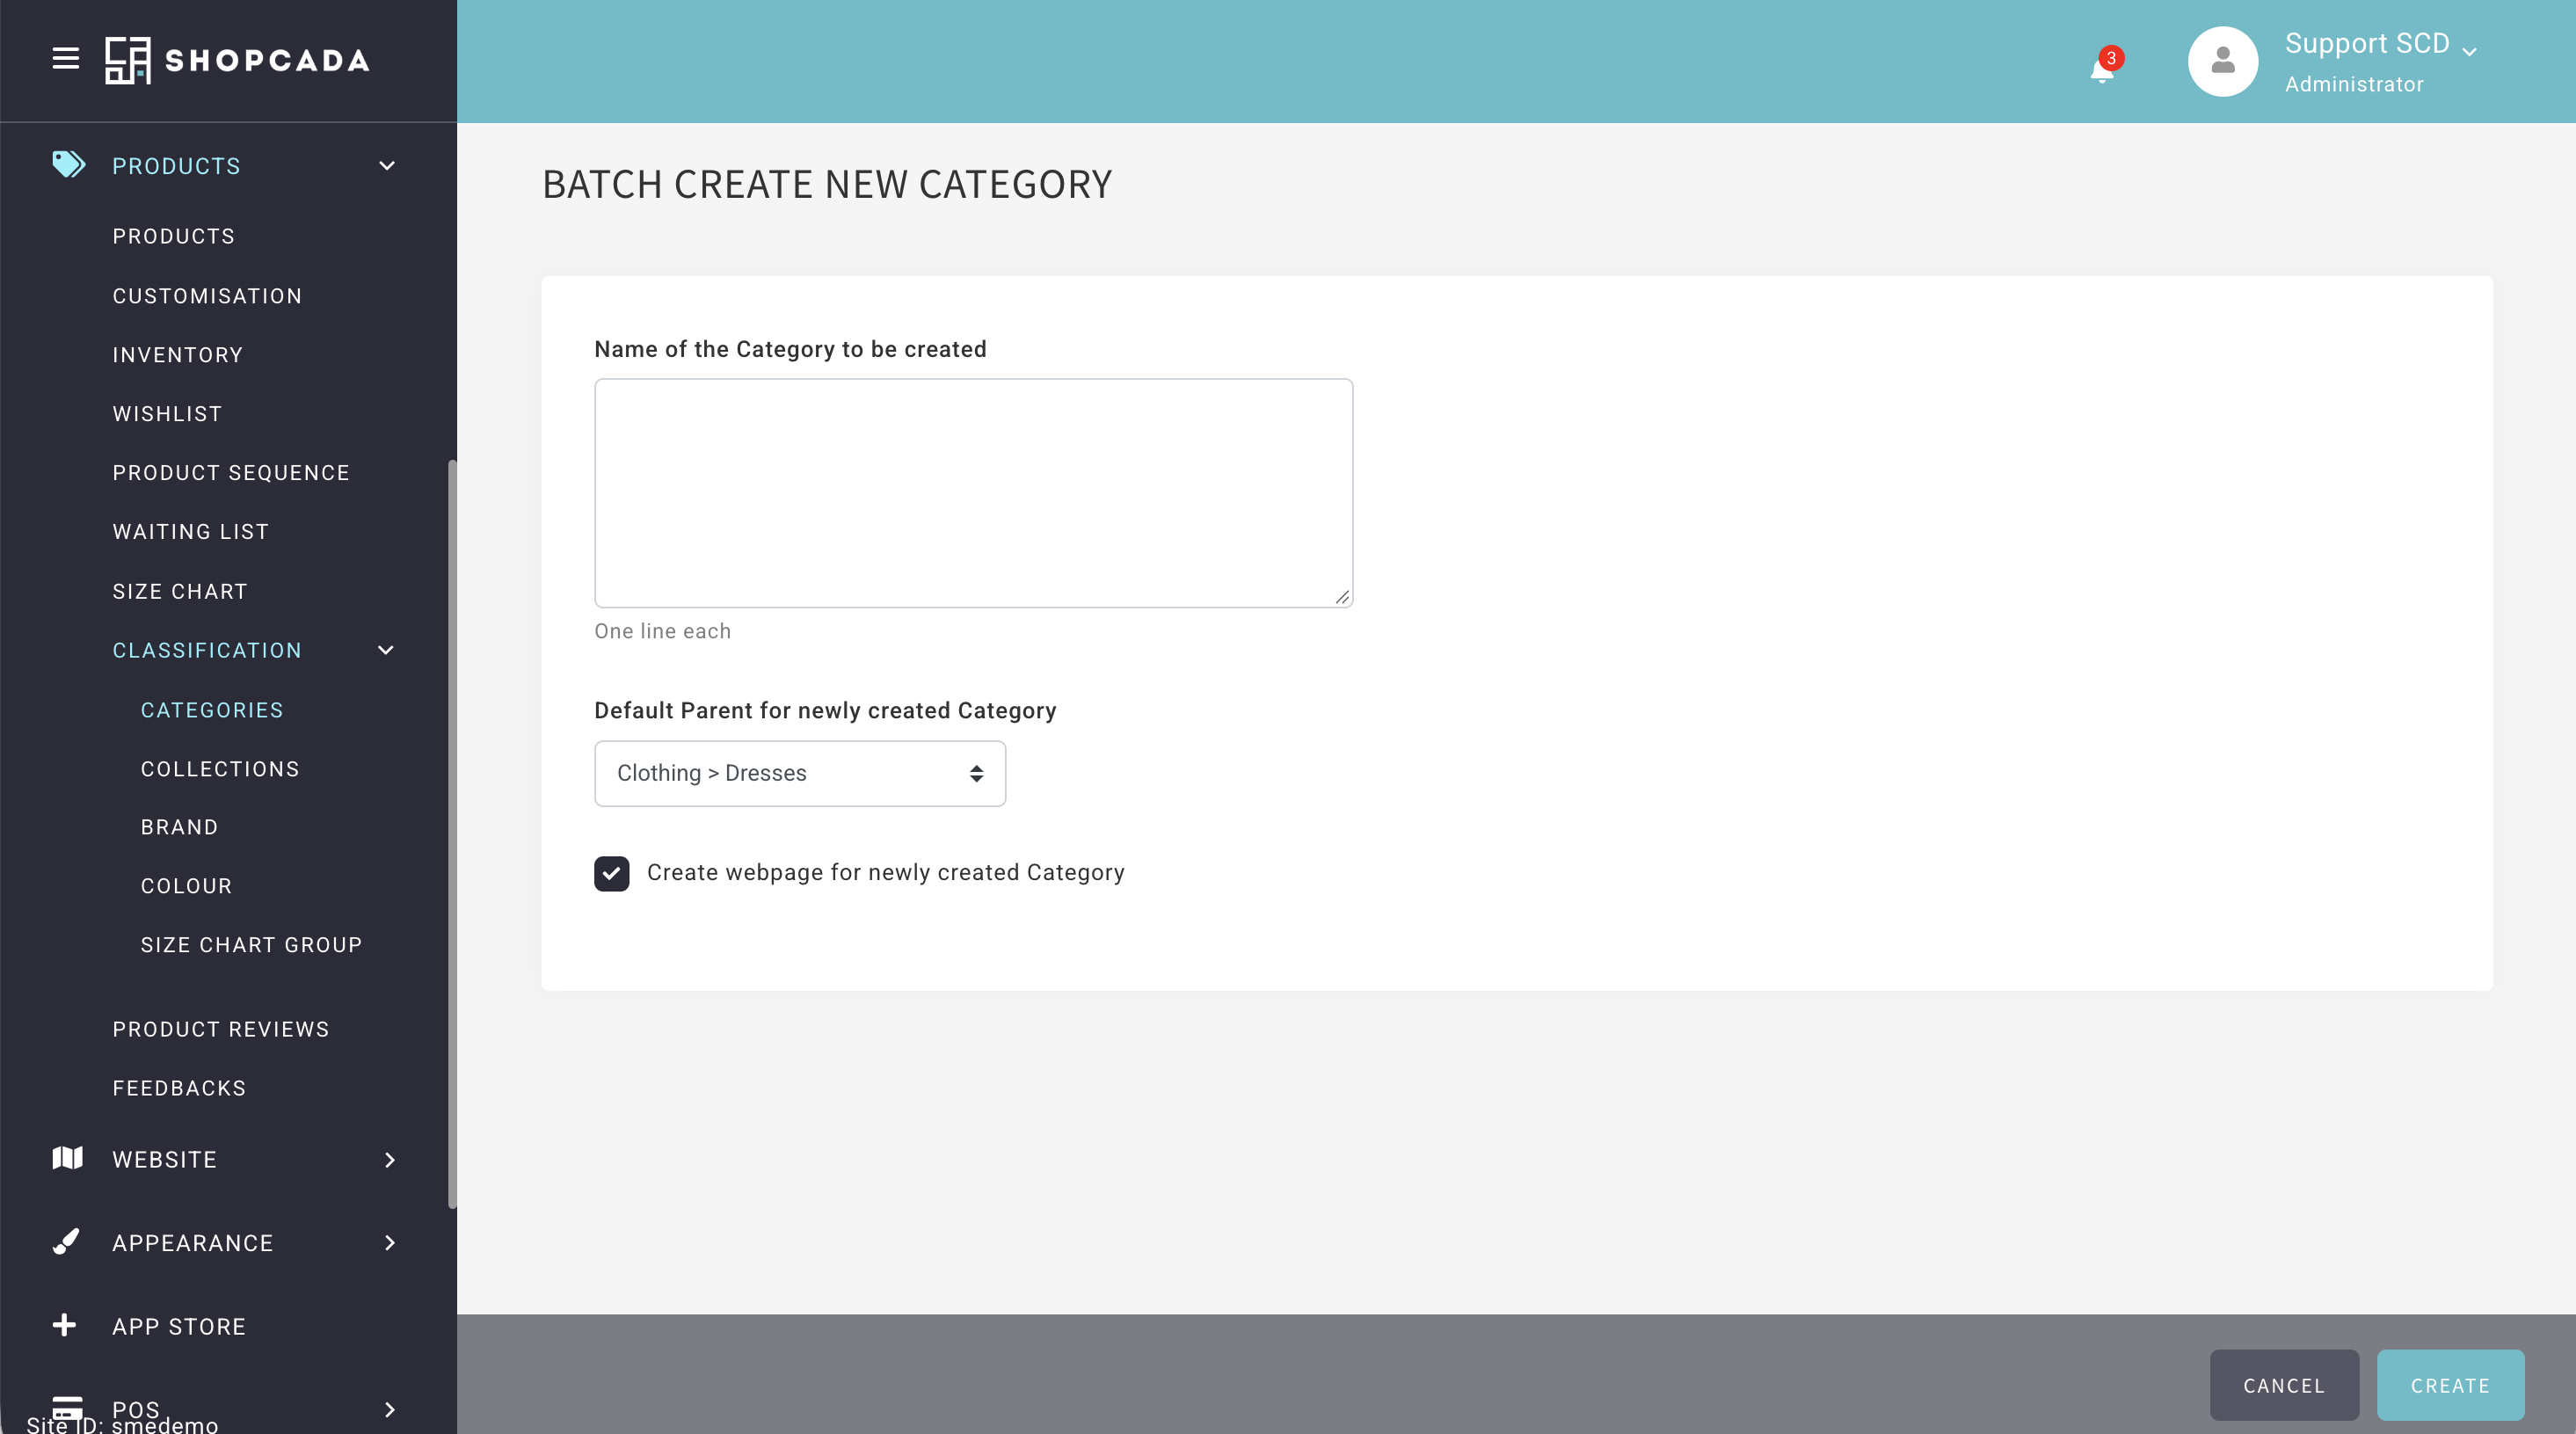
Batch Add does check. It skips a name that already exists under the same parent.
The page names the ones it skipped, and still creates the rest.
Classification Settings
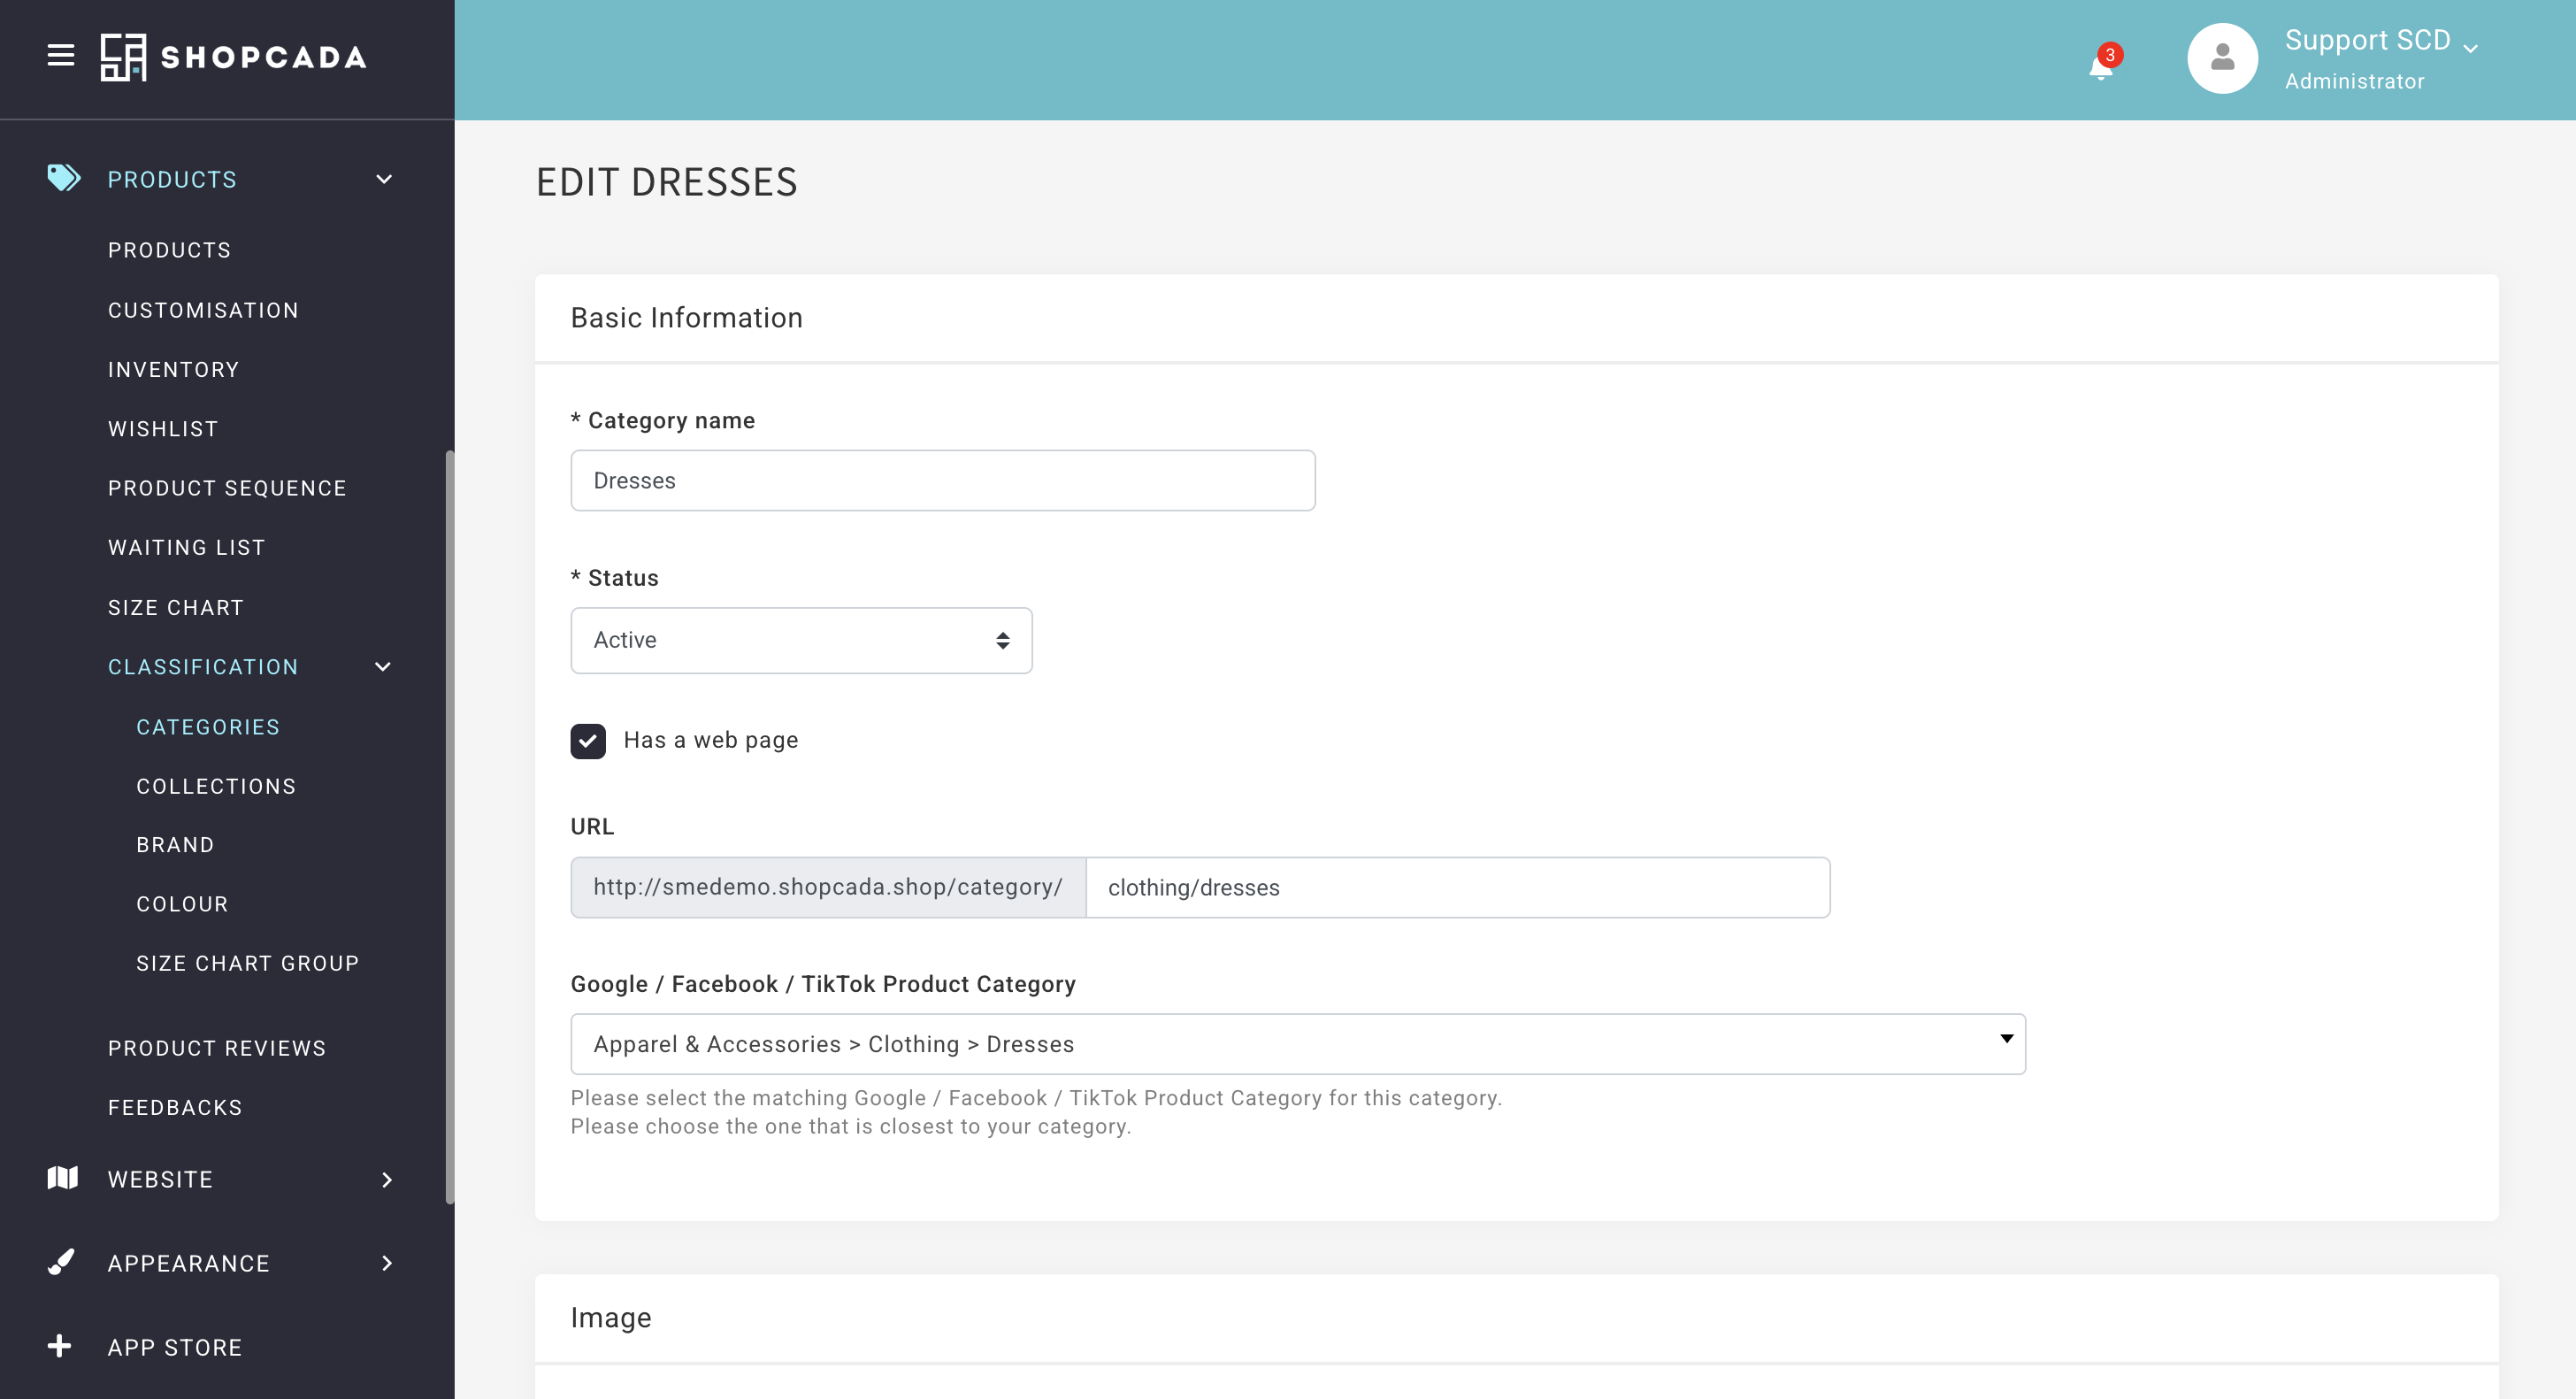
Click Edit on a row to open its settings.
| Setting | What it does |
|---|---|
| Name | Required. This is the name your shoppers see. |
| Status | Active is the normal setting. Hide From New Tagging keeps the page live and drops the row from the sub-level list shown under its parent. Totally Inactive (Hide from everything) takes it off your website. The setting is hidden on a row that has sub-levels. |
| Google / Facebook / TikTok Product Category | Categories only. Choose the closest match. The shopping feed fails while any Category with published products is left unmatched. |
| Has a web page | Tick it to give the value its own listing page on your website. Untick it and the address stops working. The products stay tagged. |
| URL | Appears once Has a web page is ticked. Shopcada builds the address from the parent names and the name. Type your own to replace it. |
| Model Attributes | Only on classifications set up for it. Height, Bust, Waist and Hip, shown on your website beside the model. |
| Upload image | Shown on the parent’s listing page, as a tile for each sub-level, on stores set up that way. |
| Ribbon Image | Categories, Collections and Brands only. A small icon over every product image in this value on the listing page. Set Position once, then upload a ribbon for Desktop, Tablet and Mobile. Tablet and mobile fall back to the desktop ribbon. Leave Ribbon Image Width empty to use the image’s own width. The section appears only on themes that support ribbons. |
| Product message to display on cart / order details | Categories and Collections only. Shown in the shopping cart, and kept on the order, for every product tagged to this value at checkout. |
| Enable POS tag line | Turn it on to add a separate message for the POS cart. |
| Text BEFORE Main Content / Text AFTER Main Content | Rich text above and below the product list on the page. Useful for SEO write-ups. |
| Limit By Destination | Only on classifications set up for it. Whitelist the destinations you will ship these products to, or blacklist the ones you will not. You cannot use both at once. |
| Shipping Rate Adjustment | Categories and Collections only. Overrides your flat shipping rates for the products in this value. Enter a First Item Rate and a Subsequent Item Rate for each shipping method. Leave a rate empty to fall back to that method’s default, which is shown under the field. The section is hidden until you have a flat rate shipping method. |
| Limit Access | Restricts the page to chosen user groups. Tick Enable limit access of this page to some customers only. Click Save. The list of user groups appears after the save, not before. |
| Meta Tags (SEO) | Appears once Has a web page is ticked. Set the Page title, Description and Keywords search engines show for the page. |
Changing a value to Totally Inactive or Hide From New Tagging removes it from your reward points redemption block, and from store credit and gift certificate reward exclusions.
Check those settings after you deactivate one.
Deleting
Delete sits beside Save when you edit an existing row.
Deleting removes every sub-level under it, and untags every product in it.
The Collections set as Sale, New and Backorder have no Delete button.
Arrange the List
The order on this page is the order your shoppers see.
- Drag a row by its handle to move it.
- Drag a row to the right to nest it under the row above.
- Click Save.
Reset to alphabetical re-sorts the whole list by name.
Reordering rows saves quickly.
Moving a row under a different parent relinks every product in it, so that save takes longer on a large catalogue.
Published Products counts what is live on your website. Total Products includes the unpublished ones.
Product Manager opens your product list filtered to that row.
Tag a Product
On a product, the Product Classification section holds one field per type.
On a saved product the section is locked. Click Edit beside the heading to change it.
Only the lowest level can be chosen. Tag the sub-level, and the product still appears under its parent.
A Collection or tag you type that does not exist yet is created when you save the product. A Category must already exist.
To change many products at once, see Update Product Classification in Bulk.
On a Product Import File
- Category is required. Every other classification is optional.
- Separate several names with a comma.
- Write the full path when a name sits under a parent, such as Apparel > Tops.
Create your classification values before you import.
A name that matches nothing is ignored, with no error, and the product imports without it.
